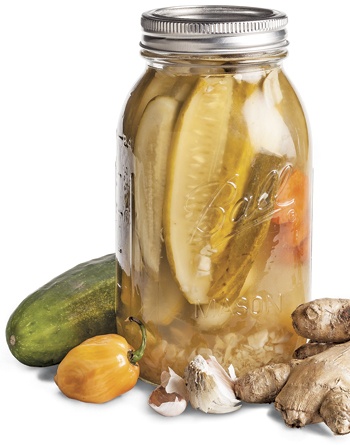
It used to be that I made pickles exclusively in the refrigerator, filling jars with the jalapeños, okra or cucumbers from the garden, adding salt, garlic, chile pequins and other spices, then topping them off with vinegar. That’s a fairly simple procedure, and it makes decent pickles, but soon the refrigerator became crowded with containers.
I’d always thought of canning as a too-complicated, too-time-consuming procedure that I’d never figure out. That is, until I actually tried it.
It turned out to be much simpler than I thought. It is a bit time consuming, depending on what you’re making. And it is a bit more work to sterilize jars and process them. The biggest complication—and danger—is working with a big pot of boiling water. But to put up veggies and fill the pantry has become a favorite hobby.
If you are not already a canny canner, do some homework before investing in the necessary equipment. You can find a complete home-canning guide from the U.S. Department of Agriculture as a free download from the National Center for Home Food Preservation.
I got a lot of guidance from a how-to guide and cookbook called Tart and Sweet, 101 Canning and Pickling Recipes for the Modern Kitchen (Rodale, 2010) by Kelly Geary and Jessie Knadler. The authors offer to the beginning canner step-by-step instructions and advice that are informative and easy to follow. And among the 101 recipes listed in the book, I found one for pickles that was especially intriguing.
Ginger Garlic Pickles
6 pounds pickling cucumbers
4 cups rice vinegar
3 tablespoons kosher or pickling salt
8 tablespoons minced garlic
8 tablespoons grated fresh ginger
4 habanero or serrano peppers
- Trim ends from the cucumbers and quarter into spears. Bring the vinegar, salt and 2 cups of water to a boil in a nonreactive saucepan, such as stainless steel, ceramic, glass or coated metal. Stir to dissolve the salt.
- Sterilize four quart-sized jars. Place 2 tablespoons garlic, 2 tablespoons ginger and 1 pepper in the bottom of each hot jar. Pack the cucumber spears in as tightly as possible without crushing. Pour in the boiling brine, leaving 1/2 inch of headspace. Make sure the cucumbers are submerged in the brine.
- Check for air bubbles (tapping jars lightly on countertop can release any trapped air), wipe the rims and seal. Process for 10 minutes. Cool on a rack. The lids should seal down onto the jars.
Servings: About 40. Serving size: 2 pickle spears. Per serving: 13 calories, 0.4 g protein, trace fat, 1.7 g carbohydrates, 0.5 g dietary fiber, 525 mg sodium, 1 g sugars
Cook’s Tip: Because the cucumbers are not peeled, try to use organic (straight from the garden if you have one). Store-bought varieties are often coated in wax. If that’s all you have, you can scrub off the wax in hot water first.
Cook’s Tip: If your tap water is chlorinated or if you have a water softener, using distilled or purified water in the brine will give you better results.
Pickling (and Canning) Do’s and Don’ts
Do: Reuse clean, undamaged jars and rings.
Don’t: Use lids more than once.
Do: Use kosher or pickling salt.
Don’t: Use table salt in pickling. The impurities in the salt may make your brine cloudy.
Do: Use vinegar of at least 5 percent acidity. That information can be found on the label.
Don’t: Use vinegars of unknown acidity.
Do: Sterilize jars by boiling at least 10 minutes. Keep jars hot as you are working to fill others. Pouring hot liquid in a cold jar can cause it to break.
Don’t: Sterilize jars in dishwasher.
Do: Allow the proper amount of headspace, 1/4 inch for liquid canning such as pickles; 1/2 inch for jams and jellies. This allows the food room to expand while it’s being processed.
Don’t: Fill jars to the rim if they are going to be processed after filling.
Do: Throw away anything that is too old or looks questionable. Better to waste a little food than to contract food poisoning.
Don’t: Consume home-canned food more than a year old, or from a jar with a bulging lid.


